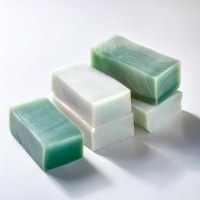
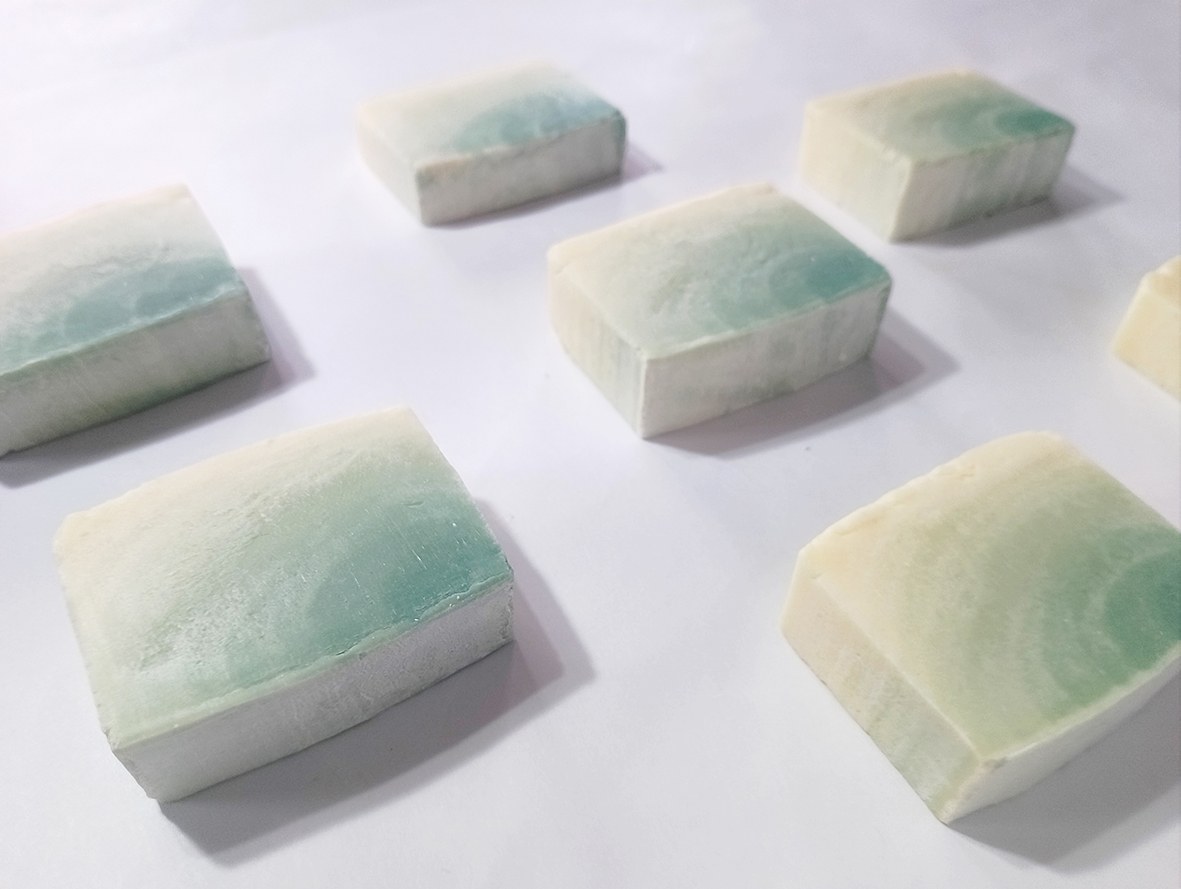
Green ombré soap made from natural ingredients can be made at home too — let’s do it together. We bring you instructions on how to make ombré soap using the cold process method, i.e. using sodium hydroxide and a combination of oils and butters. All you need is an ideally rectangular silicone mould at hand and you can start!
About this recipe
The tutorial for making green ombré soap was prepared by Ivana Jačalová. It is a solid soap made using the cold process method — a blend of vegetable oils and butters was used in combination with an aqueous solution of sodium hydroxide.
The blend was coloured with mica powder, but the colour you choose is entirely up to you. The top of the soap was covered after hardening with a white shimmering mica powder — however, this is only an optional decoration.
Key benefits
- An ombré effect from a single batter
Green batter is added spoonful by spoonful to the uncoloured soap batter and equal amounts are poured off — this creates a smooth colour gradient.
- 5 % superfat
The oils are present in 5 % excess relative to sodium hydroxide, so this portion remains unsaponified and provides skin care when the soap is used.
- The colour just as you imagine it
Mica powders are available in a wide palette of colours and are well stable even in an alkaline environment, so they do not change colour.
- A fragrance that will not disturb the ombré
Fragrance oils do not have an intense colour, so they will not disturb the ombré effect of the soap — unlike some dark essential oils.
- Balanced hardness and lather
Coconut oil gives hard and bubbly soaps, shea butter a gentle creamy lather and caring properties, and olive oil mildness.
Product properties
Key ingredients in the recipe
Below you will find more detailed information on the ingredients used, including their properties and options for substituting these ingredients.
Sodium hydroxide
Without sodium hydroxide, the saponification process will not take place and you will not produce solid bars of soap. Therefore, if you are wary of using this ingredient, you can, for example, use ready-made melt-and-pour soap bases and make soaps from them. Do not change the weight of sodium hydroxide — it is linked to the amount and type of oils used. Handle it carefully; it is a strong alkali.
Olive oil
Olive oil is the basis for making many types of soaps. It gives mild and caring soaps, but soaps with a high proportion of it can be softer and may become slightly slimy in use, so it is often combined with butters or coconut oil to achieve optimal hardness and soap properties.
In the recipe, olive oil can be substituted with another vegetable oil, but such a recipe must be recalculated using a soap calculator, as the amount of sodium hydroxide and water required will change. The same applies when substituting other oils and butters.
Coconut oil
Another popular oil for soap making is coconut oil. This oil produces beautifully hard and bubbly soaps. For this reason, it combines very well with liquid vegetable oils. You can also choose the refined version if you are looking for ways to reduce ingredient costs, as the reaction with sodium hydroxide will be the same regardless of whether the oil is refined or unrefined.
Shea butter
A gentle creamy lather and caring properties are given to your soap precisely by shea butter. In addition, compared to olive oil, it imparts some hardness to the soap. Thanks to the superfatting, the unreacted portion of shea butter will excellently moisturise the skin.
Mica powder
To colour the soap, mica powders were used. Mica powders are available in a wide palette of colours, so choose your favourite one. An additional advantage of mica powders is that they are well stable even in an alkaline environment and thus do not change colour. It is advisable to disperse them in a little oil before adding and to add them through a sieve — this prevents the formation of lumps of undispersed colourant.
Other ingredients
Demineralised water is a must when making soaps — always use distilled or demineralised water. Minerals in ordinary tap water cause undesirable reactions with sodium hydroxide, so avoid such water. Otherwise, your soap may not harden properly and may not reach a safe pH.
Fragrance oils were used to perfume the final product. These oils have the advantage that they do not have an intense colour and therefore do not disturb the ombré effect of the soap. For this reason, in this case it is good to avoid dark essential oils, which are indeed an alternative to fragrance oils, but some have an intense colour and may also colour the finished soap. Fragrance or essential oil can, however, also be completely omitted. These substances are added in relatively high amounts, as part of them will react with sodium hydroxide, so an excess is necessary.
Titanium dioxide is a strongly white substance used in soap making to lighten the soap and thus reduce the consumption of other colourants. It is advisable to choose a type of titanium dioxide suitable for use in oils and to disperse this substance well in a small amount of oil before adding it to the soap (ideally through a sieve). You can also omit titanium dioxide, but then it is necessary to increase the dose of green mica powder by approx. 0,5 g.
Isopropyl alcohol — IPA is a great helper not only when making soaps from soap bases, but also when using the cold process technique. It helps to prevent the formation of soap ash — a white coating on the soap, which is mainly a cosmetic defect. When cutting the soap, you can also spray the individual slices with IPA so that the soap stops sticking and does not become covered with soap ash.
Recipe (in grams)
Since every substitution of an oil or butter in the recipe results in the need to recalculate it (for example using soap calculators freely available online), the recipe is given in grams. At the same time, the total weight of oils and butters (200 g) also includes a 5 % superfat (i.e. the oils are present in 5 % excess relative to sodium hydroxide, so this portion remains unsaponified and provides skin care when the soap is used).
Shop the ingredients for this recipe
Untick what you already have MICA, AquaPearls, Snowball, 10 grecipe uses podľa potrebyin stock€2.09
| Phase / ingredient name | Amount in grams |
|---|---|
| Phase A — lye solution | |
| Demineralised water | 113,00 |
| Sodium hydroxide | 56,00 |
| Phase B — oils and butters | |
| Olive oil | 200,00 |
| Coconut oil refined | 120,00 |
| Shea butter refined | 80,00 |
| Phase C — colourants and fragrance | |
| Mica powder Enchanted forest | 1,00 |
| Titanium dioxide, oil-dispersible | 2,50 |
| Fragrance oil rose | 6,00 |
| Tools and decoration | |
| Isopropyl alcohol — IPA | as needed |
| Colourless mica powder | as needed |
Method
- Protective equipment
Put on protective equipment — gloves, goggles, long-sleeved clothing. Work in a well-ventilated room using plastic or stainless-steel containers or heat-resistant/laboratory glass.
- Lye solution Phase A36 – 38 °C
Weigh the required amount of demineralised water. In a second container, weigh the sodium hydroxide. While constantly stirring, in small portions, pour the sodium hydroxide into the water. Be careful, the mixture will heat up intensely! After the sodium hydroxide has dissolved, allow the solution to cool to 36 – 38 °C.
- Oils and butters Phase B36 – 38 °C
Into a heat-resistant container, weigh the butters and oils. Start to heat gently until the butters have melted. Mix well and allow to cool to 36 – 38 °C. Remove about 2 tablespoons, mix one thoroughly with the titanium dioxide and the other with the mica powder.
- Combining the phases Phase A + B36 – 38 °C
Once both the sodium hydroxide solution and the oil mixture reach approximately the same temperature (36 – 38 °C), pour the sodium hydroxide solution into the oils. Stir and add the fragrance oil. Then (through a sieve) add the oil mixture containing titanium dioxide and mix well.
- Blending
Mix the blend a few times with a stick blender (the soap batter must be sufficiently fluid to be pourable, it must not have a pudding-like consistency, but the oils must not separate from the sodium hydroxide).
- Green batter Phase C25 g
Remove approx. 25 g of the mixture to one side and add the oil solution of mica powder to it. Mix well.
- First layer in the mould 15 – 20 g
Into a smaller container, pour approx. 15 – 20 g of uncoloured mixture (or use a ladle). Place the mould on a tray, prop up its longer edge with a book or a similar item and pour the mixture (the removed 15 – 20 g of uncoloured batter) evenly along the wall of the mould opposite to the propped-up side.
- Next layer with green 15 – 20 g
Into the remaining uncoloured soap batter, add a small teaspoon of the green coloured batter. Mix well. Pour off approx. 15 – 20 g (always keeping the same amount) and again pour this mixture evenly along the unsupported edge into the mould.
- Repeat until it is used up
Continue in this way until you have used up all of the originally uncoloured soap batter, into which the green soap batter was gradually added, spoonful by spoonful.
- Covering and wrapping
At the end, spray IPA over the surface of the soap and carefully pull the book out from under the edge of the mould. Cover the mould with cling film and wrap it in a blanket. Carefully lift the tray with the mould and move it to a warm place (under a radiator).
- Cutting and decoration 1 – 2 weeks
After approx. 1 – 2 weeks, the soap is ready to be cut and you can brush its top with colourless/white mica powder. If the soap is still soft, leave it to stand for another week.
- Curing and pH check 6 – 8 weekspH 9 – 10
Before use, allow the soap to cure for at least 6 – 8 weeks. Check the pH of the soap by wetting it with demineralised water and then applying a litmus strip. The pH should be between 9 – 10. Soap with a higher pH or uneven pH is not safe to use.
Tips and tricks
Do you want to make it easier to produce green ombré soap? You are in the right place. We will give you several hints and tips on making cold process ombré soap.
Sodium hydroxide is a strong alkali, so always use protective equipment when working with it. Remember to work in a well-ventilated room, away from pets and children. If it comes into contact with the skin, always rinse the area thoroughly under a stream of cold water, and you can then use diluted vinegar to neutralise any remaining sodium hydroxide. Diluted vinegar can also be used for the final cleaning of surfaces; immerse for a few minutes all tools that have come into contact with sodium hydroxide or uncured (unhardened) soap, and then wash them as usual.
When dissolving sodium hydroxide, a large amount of heat is released, so you can replace about half of the demineralised water with ice made from the same type of water. Do not use ordinary tap water or boiled water — such water still contains minerals that interfere with soap formation.
Pour the sodium hydroxide solution and also the oil-based colourant solutions ideally through a sieve. In this way, you prevent undissolved sodium hydroxide pellets from entering the soap, as well as the formation of lumps of undissolved colourants.
When working with liquid soap batter, it is good to work quickly, as the soap will thicken and harden on its own over time. It is important to maintain the same weight of soap for the individual layers. Therefore, use scales or a ladle so that each coloured layer has the same thickness and you obtain the desired ombré effect in the final result.
To check the pH of the green ombré soap, you can also use a phenolphthalein solution or strips containing it. When using phenolphthalein strips, proceed in the same way as with litmus strips, the strips should not turn pink. If you use a solution, drop it onto various parts of the soap; it likewise should not turn pink. A pink colour indicates high pH values and thus unreacted sodium hydroxide; such homemade soap is not safe to use.
Warning
As mentioned, you can experiment with homemade recipes to achieve the desired properties. However, the final result can be influenced by many factors, such as humidity, temperature, raw material quality or storage.
Before using any ingredient to make a cosmetic product, familiarise yourself with its properties, recommended dosage, storage conditions and safe handling. Every ingredient can potentially trigger an allergic reaction in sensitive individuals, so before using the product we recommend finding out whether you are allergic to any of the ingredients or the overall product, for example by a patch test.
If you have very sensitive or very acne-prone skin, or if you have other skin or health problems, we recommend that you consult a medical professional before applying a new product to your skin, whether it is a homemade cosmetic product, a pure ingredient or a commercially available product.
Frequently asked questions about the recipe
Practical questions about green ombré soap — ingredient substitutions, water, pH checking and curing.
Can I replace the olive oil with another oil?
Yes, olive oil can be substituted with another vegetable oil, but such a recipe must be recalculated using a soap calculator — the amount of sodium hydroxide and water required will change. The same applies when substituting other oils and butters.
Why is demineralised water needed?
Always use distilled or demineralised water to make soaps. Minerals in ordinary tap water cause undesirable reactions with sodium hydroxide — your soap may not harden properly and may not reach a safe pH. Boiled water contains minerals as well.
How do I check the pH of the finished soap?
Wet the soap with demineralised water and apply a litmus strip — the pH should be between 9 – 10. You can also use a phenolphthalein solution or strips containing it: they should not turn pink. Soap with a higher or uneven pH is not safe to use.
Do I have to use titanium dioxide?
You do not — titanium dioxide serves to lighten the soap and reduce the consumption of other colourants. If you omit it, it is necessary to increase the dose of green mica powder by approx. 0,5 g.
How long does the soap cure before I can use it?
After approx. 1 – 2 weeks the soap is ready to be cut (if it is still soft, leave it to stand for another week) and before use let it cure for at least 6 – 8 weeks.
I am wary of working with sodium hydroxide — is there an alternative?
Without sodium hydroxide, saponification will not take place and you will not produce solid bars of soap. If you are wary of this ingredient, you can, for example, use ready-made melt-and-pour soap bases and make soaps from them.
Conclusion
With green ombré soap, similarly to the pink soap from the previous post, you will bring a little colour into your bathroom. In addition, you can continuously enjoy the natural composition of these soaps.
Have you tried making green ombré soap? Let us know how you got on. Send your questions, observations and experiences to [email protected] and we can exchange our knowledge with each other. We will be delighted.
Our heartfelt thanks go to our dear Ivana Jačalová for the great posts with tutorials like this one on creating green ombré soap.
Until next time in the suds, friends.
Sodium hydroxide, oils and butters, mica powders and fragrance oils from this recipe can all be found among the Handymade basic ingredients.